
Waltham Wood Flooring handles hardwood floor repair across Waltham, MA, serving surrounding cities including Belmont, Watertown, Lexington, Newton, Arlington, and in 20+ years most of that work has been on floors that were laid before the Second World War and have been altered several times since. Walls have come out, radiators have been removed, outlets have moved, and each of those left a mark in the floor that somebody eventually wants to disappear.
Repair here means putting wood back, not concealing a gap. Boards are cut out and replaced with matching stock racked into the existing courses in a staggered pattern, so the run of the floor continues through the repair. Filler has its uses, but a filled area shrinks and takes color differently from the wood around it, and it declares itself within a couple of years.
The other half of a repair is finding out what caused the damage. A soft board over a slow leak, a squeak from a subfloor panel that has lifted off a joist, or exit holes from wood-boring beetles are all symptoms of something still happening. We establish the cause first and put it in the written estimate as its own line, because replacing wood over an unresolved problem simply buys time.
The Repairs We Do Most In This Housing Stock
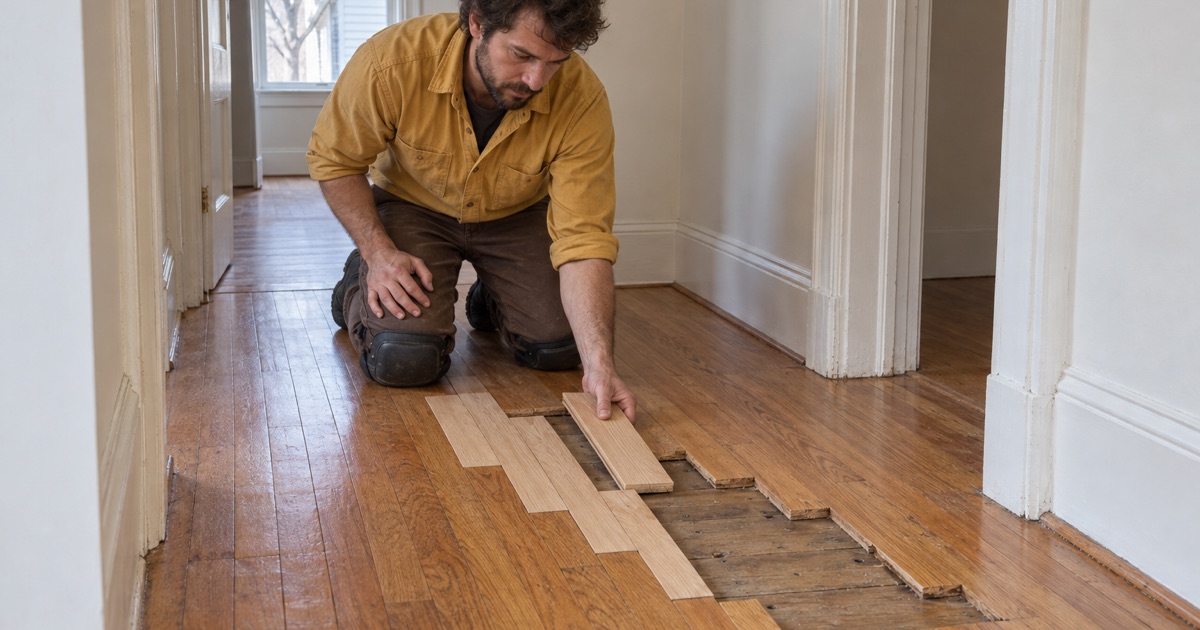
Waltham’s older houses share a set of repairs so consistently that we can usually predict two or three of them before walking in. Steam heat, a century of alterations and a long era of wall-to-wall carpet have each left their own signature in these floors. Knowing what to expect is not a shortcut in the assessment; it means the unusual findings stand out instead of getting lost among the ordinary ones.
Radiator Removal Patches
When a steam radiator and its supply pipe come out, they leave round penetrations through the flooring and an unfinished rectangle where the unit stood and no one ever walked. We cut matching boards into the surrounding courses across that whole footprint, staggering the ends so no seam aligns, which lets the floor read continuously through the area instead of showing a patched island.
Weave-In Repairs Where A Wall Or Outlet Moved
Taking down a wall between a kitchen and a dining room leaves a bare strip of subfloor the width of the plate; relocating a floor outlet leaves a small rectangle. Both are filled with flooring rather than with filler — new boards let into the opening and staggered outward, then the whole area sanded flat as one surface and finished together.
Pet Urine Staining That Reached The Subfloor
Black staining from pet urine is not a surface mark. The salts travel through the coating, through the board, and into the subfloor underneath, which is why sanding lightens it and almost never removes it. We cut the affected boards out, treat or replace the subfloor below, and weave new stock into the run rather than leaving a shadow that reappears.
Squeaks, Popping And Loose Boards
Every squeak is movement somewhere in the assembly. We identify whether it is the flooring against a fastener, a subfloor panel against a joist, or a span that was never tightly secured, then fix it at that point. Where a basement or a lower-level ceiling gives access, the repair happens from below and leaves the finished floor untouched.
Damage Below The Surface
Some of what shows in a floor is not the floor at all, and starting the repair at the surface is how a job gets done twice. A board is the last part of the assembly to show a problem and the first part anyone looks at, which is a poor combination. Where the evidence points below the flooring we open it up and establish the extent before quoting the visible repair.
Soft And Rotted Subfloor
Soft areas around a toilet flange, under a radiator that leaked, or just inside an entry door mean water reached the subfloor a long time ago. We open the area, follow the rot to sound material, replace subfloor and joist sections where the structure has gone, and only then lay new flooring into the opening.
Powderpost Beetle And Old House Borer
Small round exit holes with fine frass beneath them indicate wood-boring insect activity, and the critical question is whether it is active. We read what the holes and the powder are telling us, bring in a licensed pest operator where treatment is needed, and replace the weakened boards once the infestation has been dealt with rather than sanding over it.
Movement In The Structure Underneath
A dip that runs across several boards, or a floor that has developed a slope, is usually a framing question rather than a flooring one. We say so plainly. Flattening a floor by sanding it thinner is a solution that costs the floor its remaining life, and it does not address whatever is moving below.
Matching Old Wood To New
A repair is judged on whether it disappears, and that comes down to a handful of decisions made before anything is cut. None of them are difficult in themselves, and all of them are irreversible once the new stock is fastened down. Getting the material and the layout right at the start is what makes the finishing stage a formality rather than a rescue.
Species, Cut And Board Width
We match species, cut and board dimensions rather than color, since color is what the sanding and finishing stages resolve. Red oak strip flooring is straightforward to source. Wide plank, rift and quartersawn material, and old eastern white pine take longer to find in matching sizes, and that lead time goes into the schedule honestly.
Grain Direction And Stagger
New boards are racked so their end joints fall well clear of one another and of the existing joints around them. A patch whose ends all line up reads as a rectangle from across the room even when every board is a perfect match, because the eye picks up the seam pattern long before it picks up the grain.
Blending The Finish Across A Repair
A new board finished on its own will not match an aged floor, however well the wood is matched. Blending means sanding the repair and the surrounding floor as a single surface and coating them together, which usually makes the practical unit of work a whole room rather than a single patch. We are clear about that at estimate stage.
Our Step-By-Step Repair Process
Diagnosis Before Demolition
We start by establishing what caused the damage, including moisture readings where water is suspected, rather than by opening the floor. A repair scoped from the symptom alone tends to grow once the boards come up, which is exactly the kind of surprise a written estimate is supposed to prevent.
Scope And Written Estimate
Everything found goes into an itemized written estimate as its own line — flooring work, subfloor work, anything that belongs to another trade. You can see what the repair costs, what the blending costs, and what is optional, before any commitment is made.
Cutting Out And Weaving In
Damaged material is cut back to sound boards on a staggered line, the subfloor beneath is checked and repaired, and matching stock is racked into the existing courses and fastened the way the original floor was. Tongue-and-groove boards in the middle of a run are let in so the profile stays engaged.
Sanding And Finishing Into The Floor
The repaired area and the surrounding floor are sanded flat as one plane through a full grit sequence, then finished together. Where the whole room is being recoated, the repair vanishes. Where only a section is in scope, we show you what the boundary will look like before the finish goes on rather than afterward.
- 20+ Years On Wood Floors
- Written Itemized Estimates
- Stain Samples On Your Own Floor